Pages

Showing posts with label sew. Show all posts

Sunday, May 25, 2014

Pointy Sleeve Dress


Assalamualaikum!
Bismillah...
 

Two weeks ago I tried to customize a pattern.
Really, I did envy all ladies out there who have made cute things with their own drafted pattern.
So... I pushed my self a little harder to work it out. My girl should be able to wear this dress on Sunday.
It was simplicity pattern that I have been used in making dress for my girl all this time. I used its bodice pattern as a guide to draw my own one.
The main idea was I wanted a simple A line dress with a small cap sleeve and a big pocket on the front (I always have problem with sleeve, though...sigh)
Okay, I went like this for the upper bodice:
  1. I traced the bodice onto a paper.
  2. For the cap sleeve, I drew a straight line extending the shoulder line about 1.5 inches
  3. I marked the arm hole about an inch up from the bottom arm, and then I connected this to the end of the first line I drew. And I smoothed its corner by curving it a little bit. (I missed something out here, the dress would speak)
  4. I cut down the length of the bodice to an inch from the bottom arm hole.
Front bodice: on the left was the original pattern
Back bodice
Sleeve
For the skirt I just make a slight A line. I wanted it as a top so it's about 8 inches in length.
Skirt: slight A line


I picked this love yellowish fabric for the skirt and red polka dot for the bodice.
The sewing was taken on Sunday...after I prepared meals for the whole family. Perhaps this was the fastest dress sewing I ever did, after the peasant dress. (Well it's took few hours work though....hahaha)
And here it is

Front view

Back view
For the closure I used 3 buttons with elastic loops. At first I planned using regular button holes, but time's ticking. (The original pattern called for zipper for closure) and I also skipped the pocket idea.


Did you notice something odd with this dress? I did.
1. The sleeves. If you took a look from the top you'd see it. It's pointy rather than curved
2. The up side down pattern on the front skirt.
I did not plan on that.  Lesson learned.

Anyway the dress was nicely fit on my girl. And we're having a great afternoon that day with a new dress fresh from the sewing table :)


Have a great day everyone
Wassalamualaikum.


Make It and Love It

Monday, May 5, 2014

Pretty Clutch


Assalamualaikum!

I have a new clutch...Errrr...What so special with that?
Remember this wallet? It's THE ONLY everyday wallet I have. Can't you believe that???
Well, I was planing to use only my handmade for my things, but poor me, I didn't have time was too lazy to make things. Most of the time I make thing when I need it. And yes, I need it now. This wallet really need some wash. On top of everything, I need to practice what I have learned from books and from great people out there who have willingly and kindly shared their knowledge.

For this clutch I used the tutorial from this book. For the fabric I used local canvas fabric for the outer and cotton for the lining. I was (still) experimenting on the interfacing. I used several types of interfacing for this clutch.

Two buttons?? Well...I did not plan on that. It was my hubb brilliant idea. He found me crying, screaming desperately knowing I mistakenly measured when installed the button after a long 3 hours working. He gave me the idea to install new button instead of replace the main body and used the old one for an accent. Brilliant!!

This clutch has 3 card slots, zippered pocket and 2 roomy compartment for cash, bills, and my cell phone. And my own label ;)


 Though it was not perfect, I was pretty pleased with the result as it was my first trial.
 And definitely will sew more. Practice makes perfect, right?!


Have a nice day
Wassalamualaikum!


Wednesday, January 8, 2014

New Year, New Hope, New Curtain....Why Not?

Assalamualaikum,

Wow...it's 2014 already ...I've been gone for so long I guess.
Happy (be lated) New Year everyone...

At the end of 2013 I got a special delivery from my father in law. My own sewing table he made for me. Yay...It's a 'real' sewing table and perfect. Now my sewing machine has its own place. All this time I was sharing table with my 7 yo boy (Well, I'm petite, so I have no problem with that... yet.)

Yay...
 So, in order to 'celebrate' the new workspace and welcoming new year, I decided to make a new curtain for my kids room. And lucky me...I found a beautiful linen with theme I wanted all this time. It's the festival flag theme...just perfect for decorating kids room.
I never sew a curtain before and I didn't know how, actually. So I just 'do it'.

I did not make a lot of cutting nor sewing on the fabric. I just hemmed the both side, added trim on the top and straps.
The sewing did not take a lot of time, but sewing on buttons was so time consuming. Button?
Yes, 2 snap buttons on every strap. Sound unusual? I don't know. I just 'do it'.
We have regular curtain rod in the house (the one that has rail on it and need little hook to hang the curtain). I don't want to take it down, so I have to improvise on the strap.
Adding snap button on the strap was the perfect solution. I used a 1/2'' snap button.
After an on and off days here it is.....my very first curtain

Before
After
And this is the strap detail


My first finished project in 2014 and lesson learnt.
What do you have recently?

Wassalamualaikum.

Monday, November 4, 2013

Twirly Hat

Assalamualaikum!

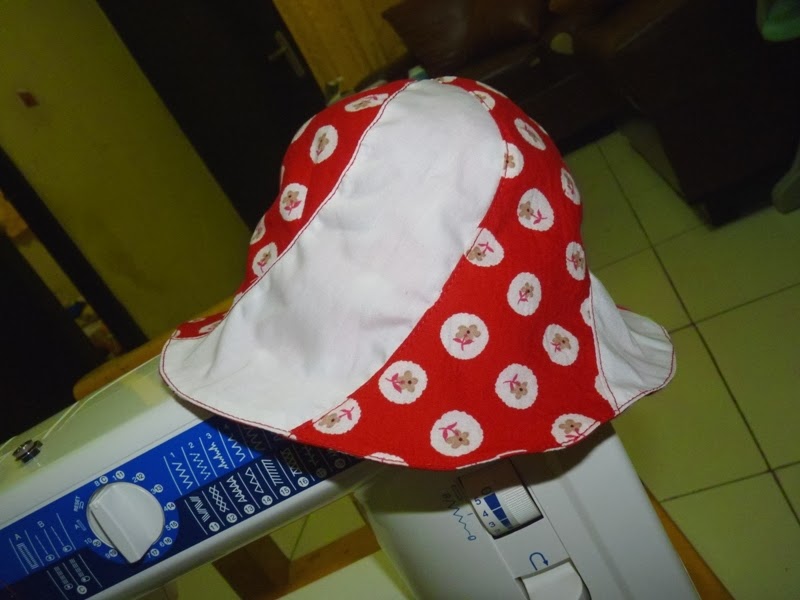
Yay....Alhamdulillah...I finally finished the hat I mentioned on the previous post. Yes, it took more time for me just to figure out how to put those hat pieces to one (sigh...)
It was a simple McCall's pattern actually, but... I still cut some pieces in wrong direction. My mistake...

pieces
See those 2 pieces right on the middle of the 2nd row....It was cut in wrong direction. Fortunately there are still remaining fabric.
This is how it looks after I put everything together:

side one...single fabric

side two...with contrast
Yup, this hat is reversible. Well, the pattern does not say it so. But why not? It's pretty on both side.
Now...the out fit is complete. Ready for play time under the sun.

Have a nice day.
Wassalamualaikum.

Thursday, October 24, 2013

Clam Shell Purse....I did it, yay!!

Assalamualaikum!

Sudah beberapa kali lihat dompet nan unik ini di internet. Penasaran cara buatnya bagaimana, dan bahannya apa. Browsing-browsing dapatlah tutorialnya DISINI. Ternyata ada kitnya juga dari Clover.
Dari video itu cukup jelas langkah-langkahnya dan tidak rumit.
Berhubung tidak ada niat untuk nyari kitnya, akhirnya coba membuat dari bahan yang ada saja. Untuk polanya digambar sendiri. Jadi sepertinya tidak sama persis dengan kit dari Clover.
Ukurannya dikira-kira saja yang nyaman digenggaman tangan (ku).
Eh ternyata tempat kursus quiltingku dulu pas juga ngadain kursus pembuatan dompet ini. Tapi seperti biasa...tidak biasa ikut :(
Tapi tidak apa-apa...sudah tahu caranya dari internet....tambah semangat jadinya.
Ternyata tidak butuh waktu lama untuk membuat dompet ini (yang model dasar).
Setelah gambar-gambar, gunting-gunting, tempel-tempel, jahit-jahit... jadilah dia seperti di bawah ini:

front view

side view

inside (yup...that's key in it)

side view when opened
I'm using left over fabrics and my baby cereal box for this purse. I do recycling...yay!!!
Since cereal box is not water proof I think I should find another material that perfect for this purse. Any idea? Let's think!


Have a nice day.
Wassalamualaikum


Tuesday, October 22, 2013

My First DIY Wallet

Assalamualaikum!

Alhamdulillah, akhirnya dapat kembali kesini. Setelah minggu-minggu yang ribet bin ruwet mulai dari never ending story PRT, masalah kesehatan dan pekerjaan.
Selama minggu-minggu itu masih disempatkan untuk bergaul dengan benang dan jarum meski hanya sebentar. Sebenarnya untuk pelarian juga. Well, Sewing is one of my therapy.
Salah satu hasilnya adalah ini.

New wallet just for me..yay!!
Yup...ini percobaan pertama kali membuat dompet sendiri. Karena kebutuhan sebenarnya, soalnya dompet lamanya sudah benar-benar minta pensiun.
Polanya buat sendiri?? Oooh..tentu tidak. Saya kan amatir kelas berat. Jadi saya cari-cari dan akhirnya nemu tutorial DISINI. Simpel dan kayaknya 'mudah'.

Bahannya pakai kain kanvas yang dapat di Tanah Abang. Ceritanya DISINI. Kenapa orange?? Karena saya cintah berat orange.

Menjahit dompet ini menimbulkan korban 1 jarum jahit! Yah karena keamatiran saya, jahit resleting tidak ganti kaki khusus resleting, walhasil jarum jahit melengkung. Untung tidak sampai patah.
Jarum yang dipakai masih jarum no.14 plus Bismillah. Benangnya merk Astra dan pas ngga punya warna senada kain.

Monday, July 22, 2013

Ramadhan Day-14

Assalamualaikum!

Tidak terasa sudah hampir separuh bulan Ramadhan. Up and down...high and low....
Astaghfirulloh...Ya Allah ampunilah dosa-dosaku...

Last week I finally finished my first attempt of macaroon purse making. Here it is

as a charm

inside

macaroon wannabe
Masih banyak kekurangan. Belum sesuai harapan. Setidaknya sudah bisa mengidentifikasi dimana saja yang perlu perhatian. Let's practice again!

Project this week: dress for my baby!

Have a happy fasting and day.
Wassalamualaikum.

Sunday, July 14, 2013

Ramadhan Day-6

Assalamualaikum!

Alhamdulillah, sampai Ramadhan hari ke-5 semua masih berpuasa. Kakak juga dan hari ini hari pertamanya masuk sekolah kelas 2!

Di antara waktu luang mencoba untuk 'mewujudkan' ide (atau obsesi?) yang berkeliaran di kepala ini. Salah satunya ini...mencoba membuat macaroon purse. Pertama lihat tutorialnya di sini penasaran banget pengen buat. Ternyata susah ya, harus telaten karena ukurannya imut-imut.
Hasil sementara seperti ini, masih jauh dari tutorialnya

on progress

masih berantakan jahitannya...see those peeking stitches???

Masih perlu banyak latihan!
And my little man, Kakak, he's kind of kid that can play with anything he has on hand. He made this few days ago with a paper tissue roll.

Rocket
Have work to do now...

Have a happy fasting and day.
Wassalamualaikum.